|
Apacheの起動と終了
さて、インストールすると同時に、Apacheは起動された状態となっています。
ブラウザのアドレス欄に、http://localhost/と入力してみて下さい。
インストールが成功していれば、このようなページが表示されます。
また、Version 2では、自動的に、Apache Server Monitorという常駐ファイルがインストールされています。
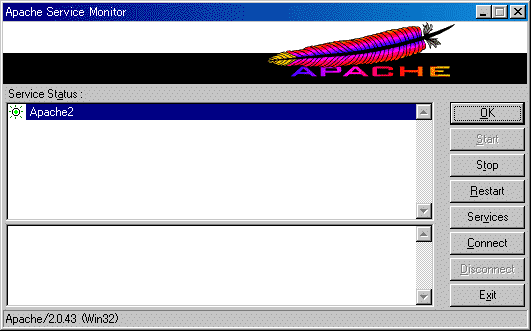
ウィンドウ右下部のタスク・トレーの中にある をダブル・クリックすると、↓下図のように、サーバ・モニタのウィンドウが表示されます。 をダブル・クリックすると、↓下図のように、サーバ・モニタのウィンドウが表示されます。

ここで、サーバのコントロールを簡単に行うことができます。
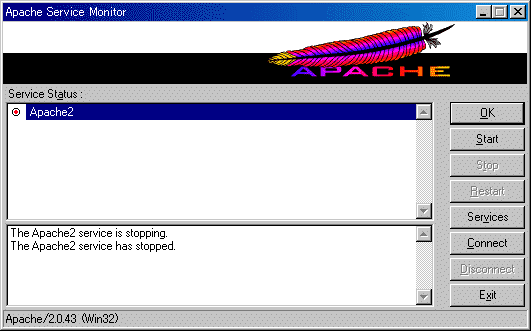
例えば、右側のStopボタンをクリックすると、Apacheは停止します。
その際、下のウィンドウの中に、ログが表示されます(↓下図参照)。

Apacheを停止すると、タスク・トレーの中にあるサーバ・モニタのアイコンが から から に変化していることが分かります。 に変化していることが分かります。
また、Windows NT系のOSにApacheをインストールすると、自動的にサービスに登録されます。
同じく、Apacheサーバ・モニタのServiceボタンをクリックすると、Windowsのサービス・ウィンドウが表示されます。
あるいは、スタート→設定(S)→コントロール パネル(C)→管理ツール→サービス、とたどって行っても同じです。
↓下図のように、Apache2という名前でサービスに登録されています。

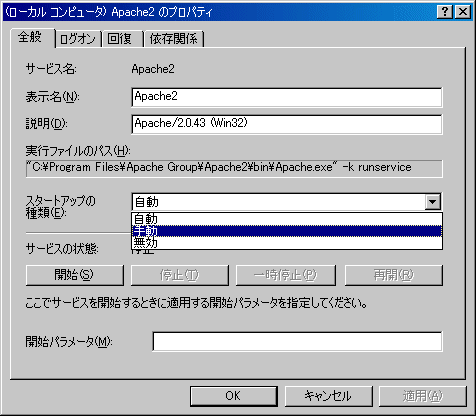
但し、デフォルトでは、スタートアップの種類が自動(=Windows起動時に自動起動)となっていますので、手動に切り替えておきます。
まず、右クリックして、プロパティ(R)を選択すると、(ローカル コンピュータ)Apache2のプロパティ・ウィンドウが表示されます。
ここで、スタートアップの種類(E)を手動に切り替え、OKボタンをクリックします(↓下図)。

再び、サービス・ウィンドウに戻ると、Apache2が手動となっていることが分かります(↓下図)。

さて、サービスに登録されていれば、コマンド・プロンプトから、
net start apache2
と入力すれば、サービスが開始されます。
また、
net stop apache2
で、サービスを停止することができます。
C:\>net start apache2[Enter Key]
Apache2 サービスを開始します.
Apache2 サービスは正常に開始されました。
C:\>net stop apache2[Enter Key]
Apache2 サービスを停止中です.
Apache2 サービスは正常に停止されました。
C:\>
|
Apacheの設定
Apacheの設定は、全て、httpd.confの中でファイルで行います。
c:\program files\apache group\にApacheをインストールした場合は、
c:\program files\apache group\apache2\conf\httpd.conf
にあります。
また、
スタート→プログラム(P)→Apache HTTP Server 2.0.43→Configure Apache Web Server→Edit the Apache httpd.conf Configuration File

を選択すると、メモ帳でhttpd.confを開いてくれます。
同じフォルダ内にhttpd.default.confというファイルがありますので、そのファイルでhttpd.confを上書きすれば、デフォルトの設定に戻すことができます。
訳が分からなくなったら、そうしましょう。
Apacheの設定の詳細については、とりあえず必要ではないので、ここでは触れません。
Apacheに関するより詳細な情報については、Japan Apache Users Groupによって、様々なドキュメントが日本語化されていますし、ApacheによるWebサーバ構築といった有用なページもweb上に幾つかありますので、それらをご参照下さい。
PHPモジュールの設定(Apache1.3.27使用)
ここでは、PHPをApacheの組み込みモジュールとして使用しますので、httpd.confで設定を行う必要があります。
httpd.confを開いて、モジュールを追加します。
但し、以下では、Apache2.0.43ではなく、Apache1.3.27を用いました。
PHPでは、まだ、Apache2の使用は推奨されていないようです。
バージョンの違いによって、設定方法も異なりますので、ご注意下さい。
まず、LoadModuleセクションの末尾に
LoadModule php4_module c:/php/php4apache.dll
と追加します(↓下図)。
但し、これは、c:\の直下にphpをインストールした場合の例です。
別のフォルダにインストールした場合は、とにかく、php4apche.dllの場所をフルパスで指定して下さい。
#
# Dynamic Shared Object (DSO) Support
#
# To be able to use the functionality of a module which was built as a DSO you
# have to place corresponding `LoadModule' lines at this location so the
# directives contained in it are actually available _before_ they are used.
# Please read the file README.DSO in the Apache 1.3 distribution for more
# details about the DSO mechanism and run `apache -l' for the list of already
# built-in (statically linked and thus always available) modules in your Apache
# binary.
#
# Note: The order in which modules are loaded is important. Don't change
# the order below without expert advice.
#
# Example:
# LoadModule foo_module modules/mod_foo.so
#
#LoadModule vhost_alias_module modules/mod_vhost_alias.so
〜中略〜
#LoadModule unique_id_module modules/mod_unique_id.so
LoadModule php4_module c:/php/php4apache.dll
|
次に、AddModleセクションの末尾に、
AddModule mod_php4.c
と追加します(↓下図)。
#
# Reconstruction of the complete module list from all available modules
# (static and shared ones) to achieve correct module execution order.
#
# The modules listed below, without a corresponding LoadModule directive,
# are static bound into the standard Apache binary distribution for Windows.
#
# Note: The order in which modules are loaded is important. Don't change
# the order below without expert advice.
#
# [WHENEVER YOU CHANGE THE LOADMODULE SECTION ABOVE, UPDATE THIS TOO!]
ClearModuleList
#AddModule mod_vhost_alias.c
〜中略〜
AddModule mod_setenvif.c
AddModule mod_php4.c
|
さらに、ファイル・タイプを追加します。
AddTypeセクションに、
AddType application/x-httpd-php .php
AddType application/x-httpd-php-source .phps
と追加します(↓下図)。
#
# AddType allows you to tweak mime.types without actually editing it, or to
# make certain files to be certain types.
#
AddType application/x-tar .tgz
AddType image/x-icon .ico
AddType application/x-httpd-php .php
AddType application/x-httpd-php-source .phps
|
通常、http://www.xxx.com/にアクセスすると、実際には、http://www.xxx.com/index.htmlにアクセスできますが、これはサーバ側で設定されているためです。
Apacheのデフォルトでは、index.htmlが設定されていますが、ここに、
index.php
を追加しておきます(↓下図)。
#
# DirectoryIndex: Name of the file or files to use as a pre-written HTML
# directory index. Separate multiple entries with spaces.
#
<IfModule mod_dir.c>
DirectoryIndex index.html index.php
</IfModule>
|
ちなみに、デフォルトでのドキュメント・ルートは、ダウンロードファイルの直下のhtdocsディレクトリになっています。
つまり、http://localhost/にアクセスすると、htdocs直下のindex.htmlが表示されることになります。
もしも、インデックス・ページの場所を変更したければ、以下のC:/Program Files/Apache Group/Apache/htdocsを適当な場所に変更すればOKです。
#
# DocumentRoot: The directory out of which you will serve your
# documents. By default, all requests are taken from this directory, but
# symbolic links and aliases may be used to point to other locations.
#
DocumentRoot "C:/Program Files/Apache Group/Apache/htdocs"
|
Apacheを再起動すれば、設定が反映されます。
| 


